

Table of contents
- Sign up for Amazon AWS
- Access Amazon SES
- Verify our email address
- Leave the Amazon SES testing environment
Sign up for Amazon AWS
Amazon SES is a service that is within the stack of Amazon AWS services, so to be able to use the SES service, we will have to sign up on the AWS platform. To do this, we will go to aws.amazon.com and we will click on the button that says “Create an AWS account”. . To do this, we will go to aws.amazon.com and we will click on the button that says “Create an AWS account”.
To fully register, we will have to follow the following steps, which are very simple and I am not going to emphasize them since this blog is about Amazon SES and not about Amazon AWS. If you need more information about the registration, click here.
- Register with an email address (any that we have access to).
- Verify the email address we have entered.
- Create a password (that is secure, please).
- Add contact information (here we will indicate if we are a company, self-employed or individual).
- Add a payment method: yes, it is mandatory, since we will pay for use
- Verify our phone number.
- Wait for our account to be activated.
Access Amazon SES
Once we have our Amazon AWS account active, we will proceed to access the Amazon SES service. For this, from the main control panel, we are going to go to the search bar that we find at the top right and we are going to search for “SES”.

Subsequently, we click on where it says “Amazon Simple Email Service”. And the following screen appears where we have to click on “Create identity”. It is important to note that it is important that you select the region before everything. Select the region that is closest to your country. In this case I am going to select Ireland.

The following tab will appear:
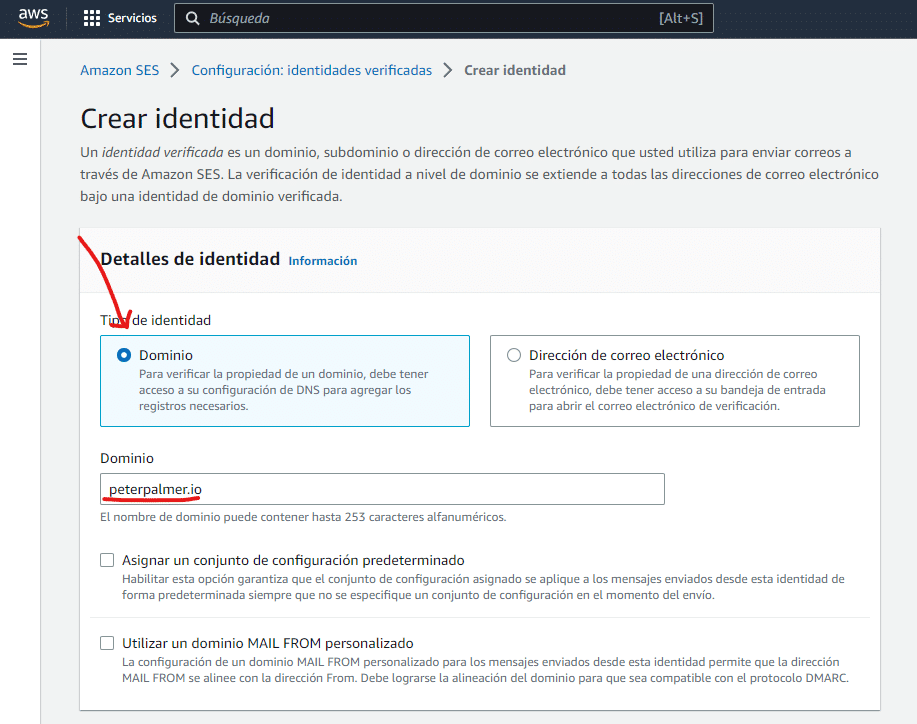
Here we can choose between email address and domain. I personally always choose domain, since verifying an email address will only allow us to send emails from an email address, for example, [email protected], while verifying the domain, we will be able to use any address under that domain without having to verify more, for example, [email protected], [email protected], etc.
We go down to the bottom and click on “Create identity”.
Verify our email address
Great, so we go to the third and penultimate step on the list, there is little left. Now comes the most complex step where most people get lost, so read carefully, I will try to explain it in maximum detail.
We will see that the following window appears:

The important part of this step is a bit further down, in the DKIM section.

Take a look at the list of DNS records. We are going to have to put those records on our domain. For those who do not know what a DNS record is, I leave here explained what it is and how it works.
But basically what we are going to have to do for this step is to access our registrar. Trying to be less technical, a registrar is an online service that allows you to register domains. In our case, we will need to access where we bought our domain, which could be Shopify, Raiola Networks, Namecheap, GoDaddy, IONOS… there are endless platforms, but I’ve listed the most well-known ones, and probably your domain was purchased from one of them. If you’re unsure, you can use a little trick which is checking the nameservers using the tool dnschecker.org.

As you can see, in my case, my domain is registered with Cloudflare. So what I need to do is go to Cloudflare and manage the DNS from there. You will need to go to where you bought the domain, don’t worry, the process is similar because it’s a universal standard.
Out of my generosity, I’m going to share with you how you can access the DNS settings depending on your registrar.
Change DNS in Raiola Networks and others.
I am now in my Cloudflare and can see my DNS records (some of which I’ve covered for security reasons).

You’ll probably see a similar panel, now we need to click on the button that says “Add record”. And the following is displayed:

Here is where we take action and fill in the information that Amazon SES previously gave us. So we proceed to fill it in, so it will look like this:


We have to repeat this process 3 times. Once for each CNAME that Amazon SES gives us. When we’re done, we just have to wait until the “Verified” box is activated on the screen.

Once we have the domain verified, we can send a test email to make sure everything is working correctly. As follows:

Leaving Amazon SES test environment
Well, finally this is the last step. And it is that if your account is new, Amazon does not trust you, it does not trust that you use their platform illicitly to send spam. So to be able to send many emails, we have no choice but to leave the test environment.
The test environment basically puts restrictions on your account so you can’t send emails. For example,
- You can only send emails to verified email addresses and domains or to the Amazon SES mailbox simulator.
- You can only send a maximum of 200 messages every 24 hours.
- You can only send a maximum of one message per second.
As you will understand, we need to leave the test environment. If not, it is of no use to us. To request that our account be removed from the Amazon SES test environment, we must follow the following steps:
- Go to our Amazon SES console.
- In the navigation panel, choose Account dashboard.
- In the warning box at the top of the console that says “Your Amazon SES account is in the sandbox”, on the right, choose Request production access.
- In the account details modal, select the Marketing or Transactional radio button that best describes most of the mail you are going to send (I suppose if you’re here it’s for the first option, Marketing)
- In Website URL, put your website’s URL so Amazon can see what type of content will be associated with what you are going to send.
- Attention, this is the most important part, in Use case description you are going to have to describe in detail what you are going to do with Amazon SES.Beware! Don’t make a 10-word text, I’m telling you from experience, write a well-written text, I recommend that you write at least 4 or 5 paragraphs. Or else they won’t accept you. Include the following:
- How do you plan to create or acquire your mailing list? Don’t directly mention MailerFind, mention that you’re going to send emails to people interested in your product or service. The emails are obtained organically.
- How do you plan to manage bounces and complaints? Mention that you’ll make use of Amazon SNS to control bounces and that you’ll clean up emails on a recurring basis to ensure there are no invalid emails.
- How can recipients stop receiving email from you? Mention that you’ll have a link in all your emails where users can unsubscribe whenever they want. Also mention that you’re committed to complying with regulations such as GDPR.
- In Additional contacts, specify where you wish to receive communications about your account.
- In Acknowledgement, check the box to agree to only send email to people who have explicitly requested it and confirm that you have a process in place to manage bounce and complaint notifications.
- Click on the Submit request button: a banner will appear to confirm that your request has been sent and is currently under review.
Congratulations! You’ve now sent your account for review, now all that remains is to wait and cross our fingers for approval. Once we have our account out of the Amazon SES test environment, we can use it to connect with our autoresponder and start sending emails massively.
In the event that you are not accepted, they will likely ask for more details, so make sure to provide all the information they request for approval.